


One of my favorite pieces of gear I own is my set of Canon 600EX-RT Speedlights. These flashes completely changed me as a photographer. Their ease of use allowed my brain to think more creatively when controlling light. It is a relatively inexpensive tool that gives you the power to create numerous looks.
I am going to walk through 5 of the ways we use speedlights to create stunning imagery.
[su_box title=”5 techniques for a single speedlight” style=”default” box_color=”#f3665e” title_color=”#FFFFFF” radius=”3″ class=“”] – Backlight at night
– Lighting rain, snow, or smoke
– Soft-boxed Key-light
– Detail shots
– Creating silouetts[/su_box]
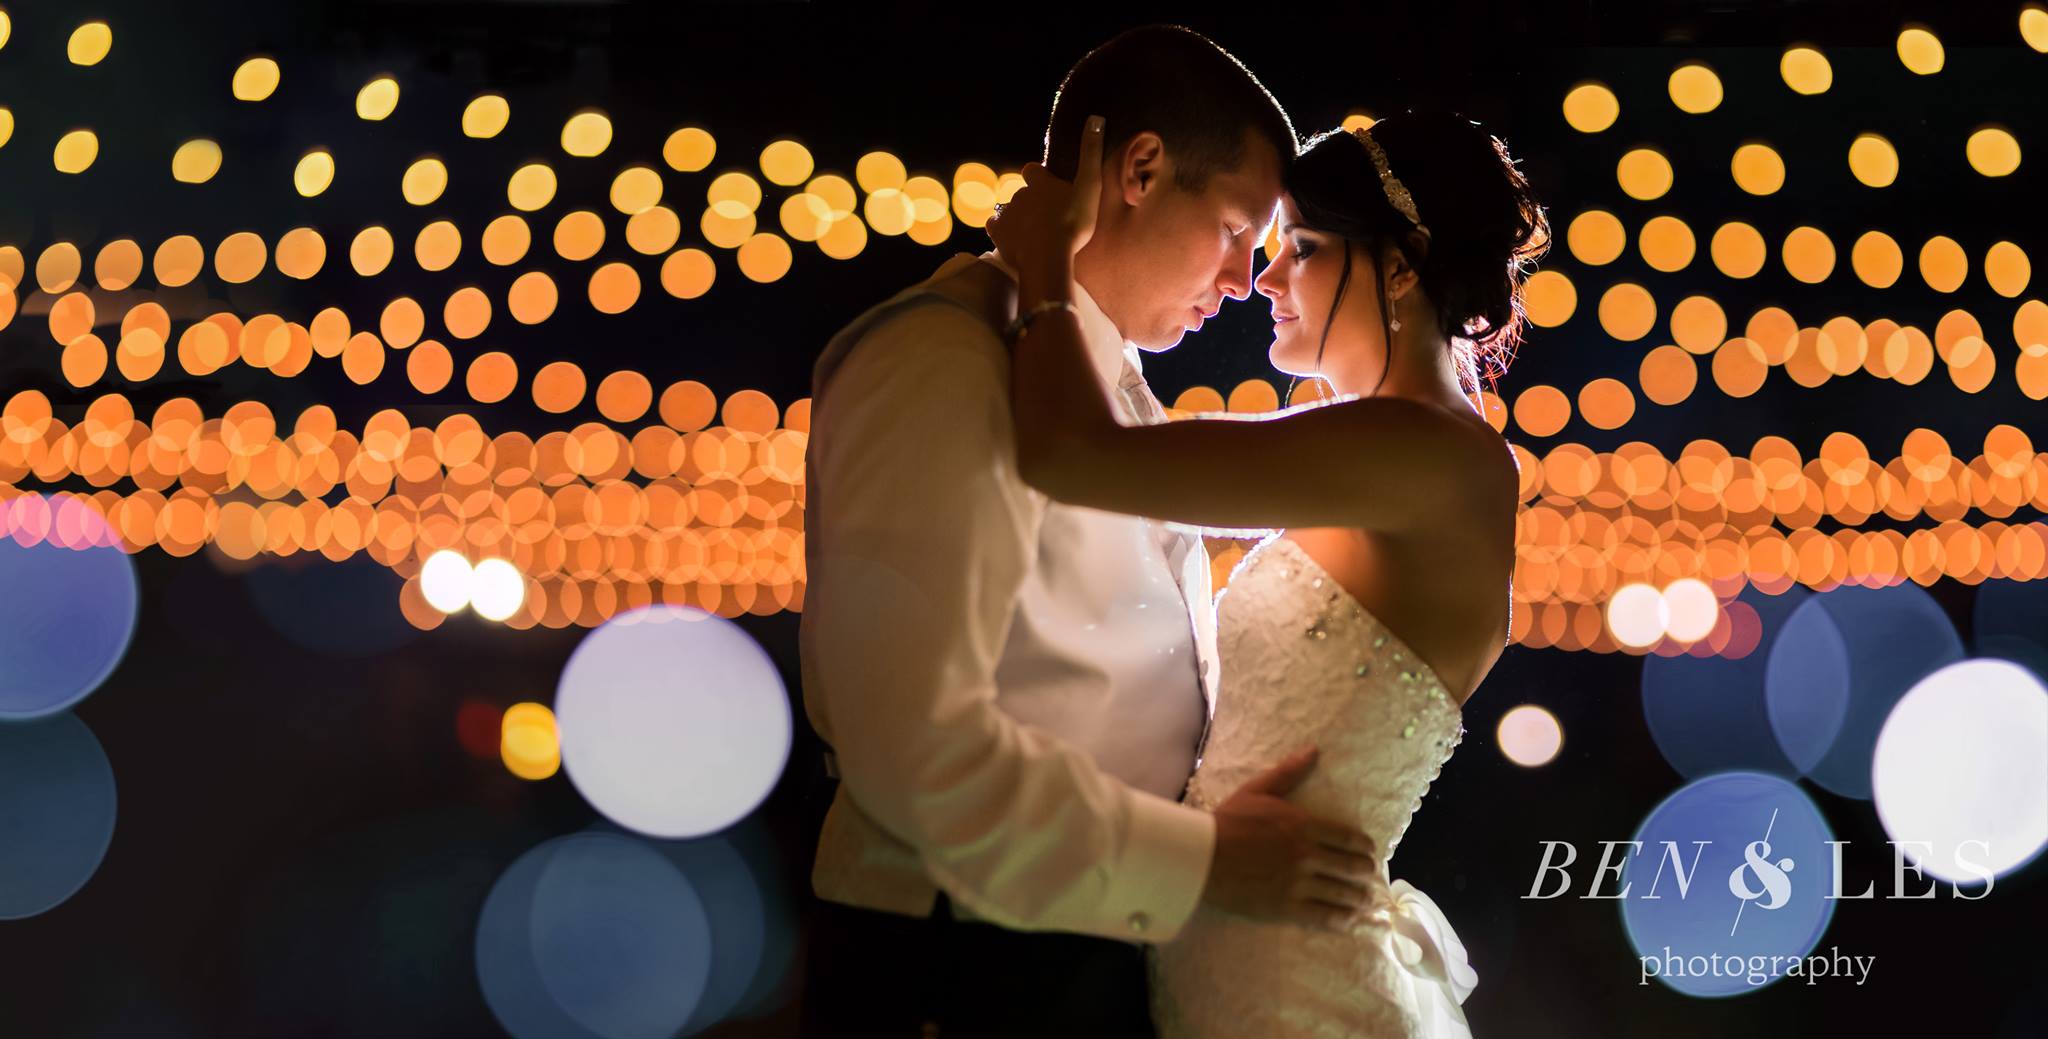
#1 Backlight at Night
This is probably my favorite as well as one of the easiest ways to use a flash. There are multiple ways to back light, some more dramatic than others. Start by expose for your ambient light. In the first photo below, the ambient lighting is the hanging lights and the car lights in the distance. Once our ambient light was set, we had our assistant hide behind the couple and point the flash at them. The light should be at head hight. If you put it on the ground and point up , you are much more likely to get unflattering shadows. You will want the flash to be about 6ft behind your subject. We start with our flash in manual powered at 1/32. We then adjust the flash power based on how much backlight we want. Th light from the flash will bounce around the white dress and his shirt, wrapping light around the couple.
Settings:
Sigma 85mm
Shutter Speed: 1/200
f/ 1.4
Iso: 1600
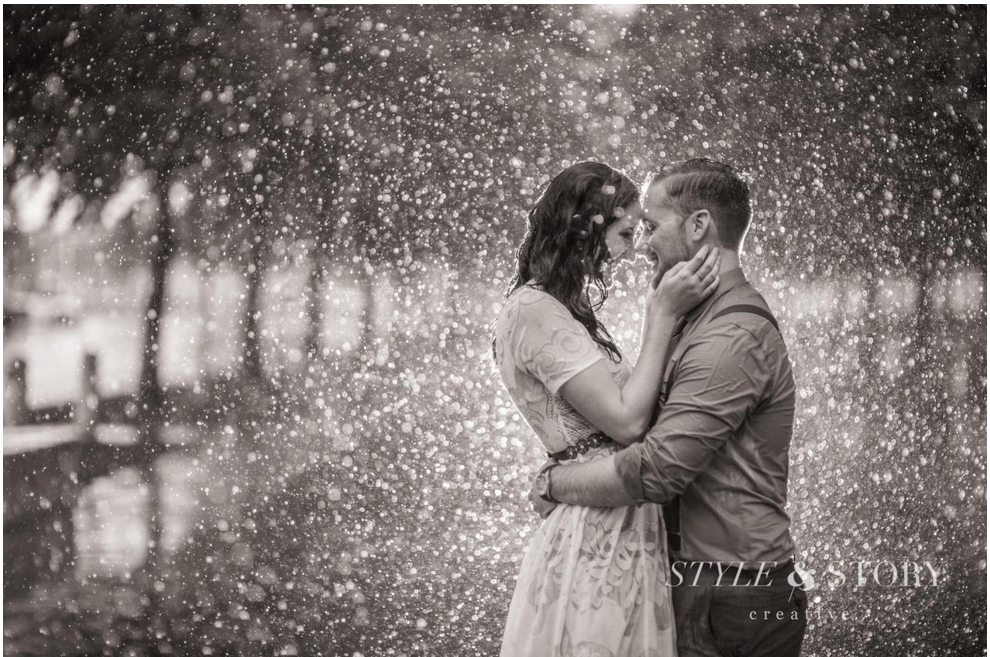
#2 Lighting Rain, Snow & Smoke
Every time I nail one of these shots I always get super stoked. There is little better than capturing rain, snow, and smoke. This concept is very similar to the backlighting concept that we talked about before. Whenever you have light shooting through rain, snow, or smoke, it illuminates it as well as brings it out the detail.
General Rules:
- Place your flash 6-10 feet behind the couple.
- Place speedlight behind the groom’s head because it tends to be bigger and it won’t blow out the brides veil.
- The lower the aperture, the bigger the drops of rain will look as they turn to bokeh.
- Set your flash to its widest throw of light.
Lets talk about this image below. We underexposed the ambient light 1-2 stops. This allows for the rain drops to stand out against the background when lit. We are using the backlight to light up the rain as opposed to the previous image, where we used it to light the couple.
Settings:
• Sigma 85mm
• Shutter Speed: 1/200
• f/ 2
• Iso: 400
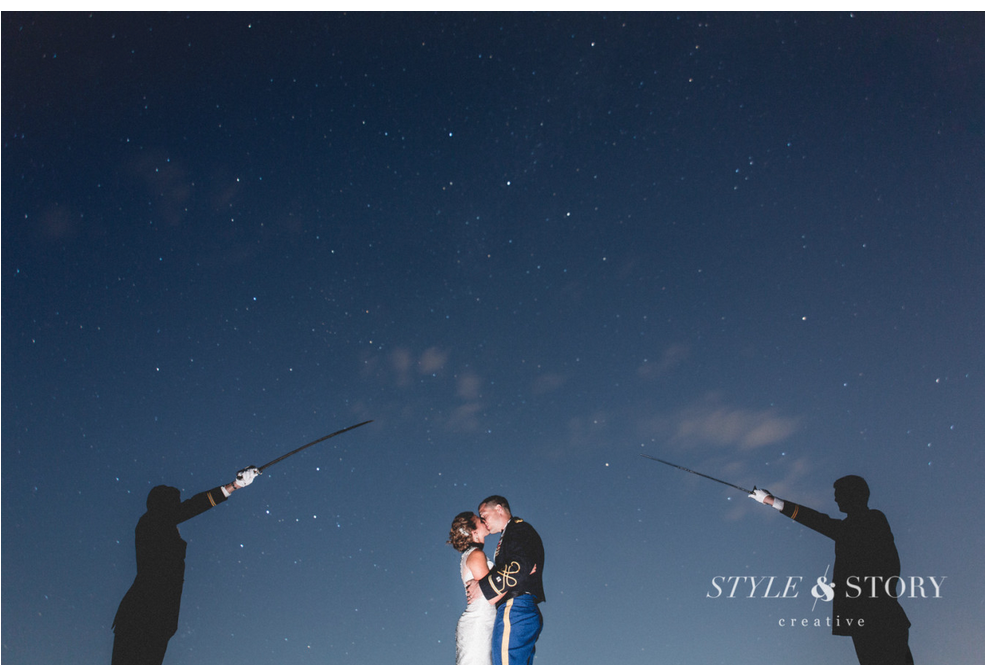
#3 Softboxed Key-light
A more traditional way to use a speed light is as a fill-light. This method does not have to used in a traditional manor and can be super powerful. Using this method you should be aware of some good rules of thumb.
General Rules:
• Have your light higher than the tallest persons chin.
• If you don’t know where to place the light, put it 45 degrees to the right or left of the couple.
• The closer the light is to the subject, the larger the light source will appear relative to the subject and the softer it will be.
• When working with couples, have the light going over the groom’s shoulder to hit the brides face in a more flattering way.
For this particular image, I set my camera settings to expose for the ambient light (which is the sky). I also knew this was going to silhouette the two outer gentlemen. From here, I actually broke one of my rules. The flash was lower than the grooms chin due to the couple being on a hill. Lastly, we flagged off the light on either side so it would only hit the bride, groom and swords.
Settings:
• Sigma 35mm
• Shutter Speed: 1/200
• f/ 2
• Iso: 1600
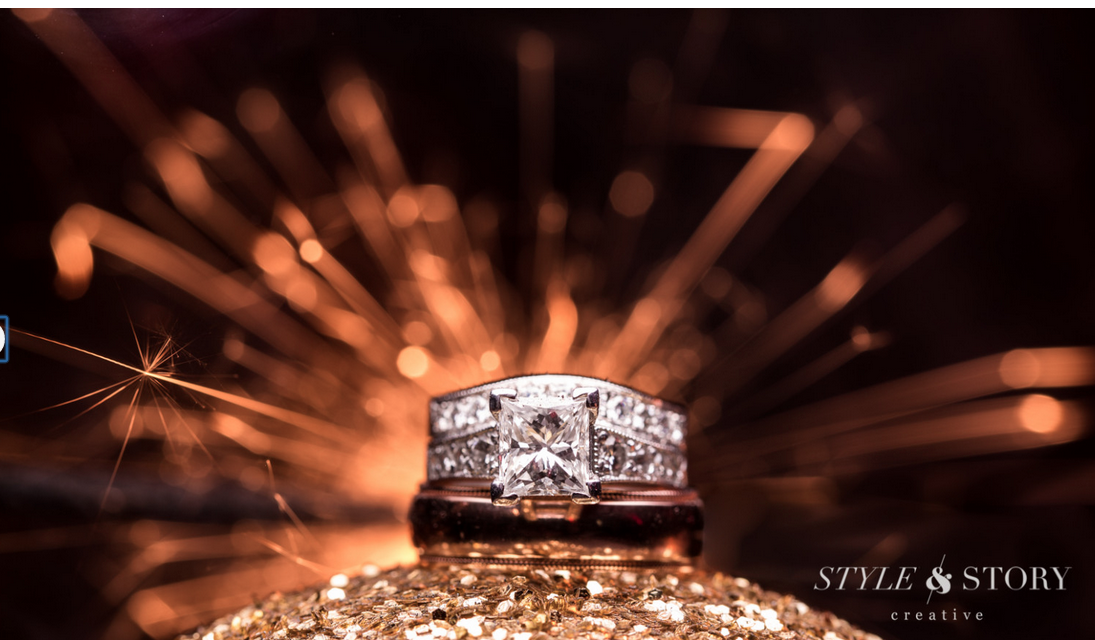
#4 Detail Shots
My challenge each wedding is to make the bride’s details look like they came straight from a magazine. Using natural light is great and I do it all the time. However sometimes natural light is limited, doesn’t make since, or I want more drama. That is when I use a flash to light the details. When shooting details we tend to put a mini softbox over the flash to make the light as soft as possible. I prefer the Westcott Micro Apollo. While shooting details, mix your lighting scenarios up. Light it from above one time and the next time light it 45 degrees to the right. Don’t be afraid to move that light around. You would be surprised how differently a shot will look by exploring the light.
This image below was one of our favorite ring shots from this year! The first thing we did was expose for our ambient (the sparkler in the background). We dragged the shutter a bit to capture the sparkler streaks, but by lighting the ring with a flash, it froze the ring in place.
Camera Settings:
• Canon 100mm
• Shutter Speed: 1/30
• f/ 4
• Iso: 200
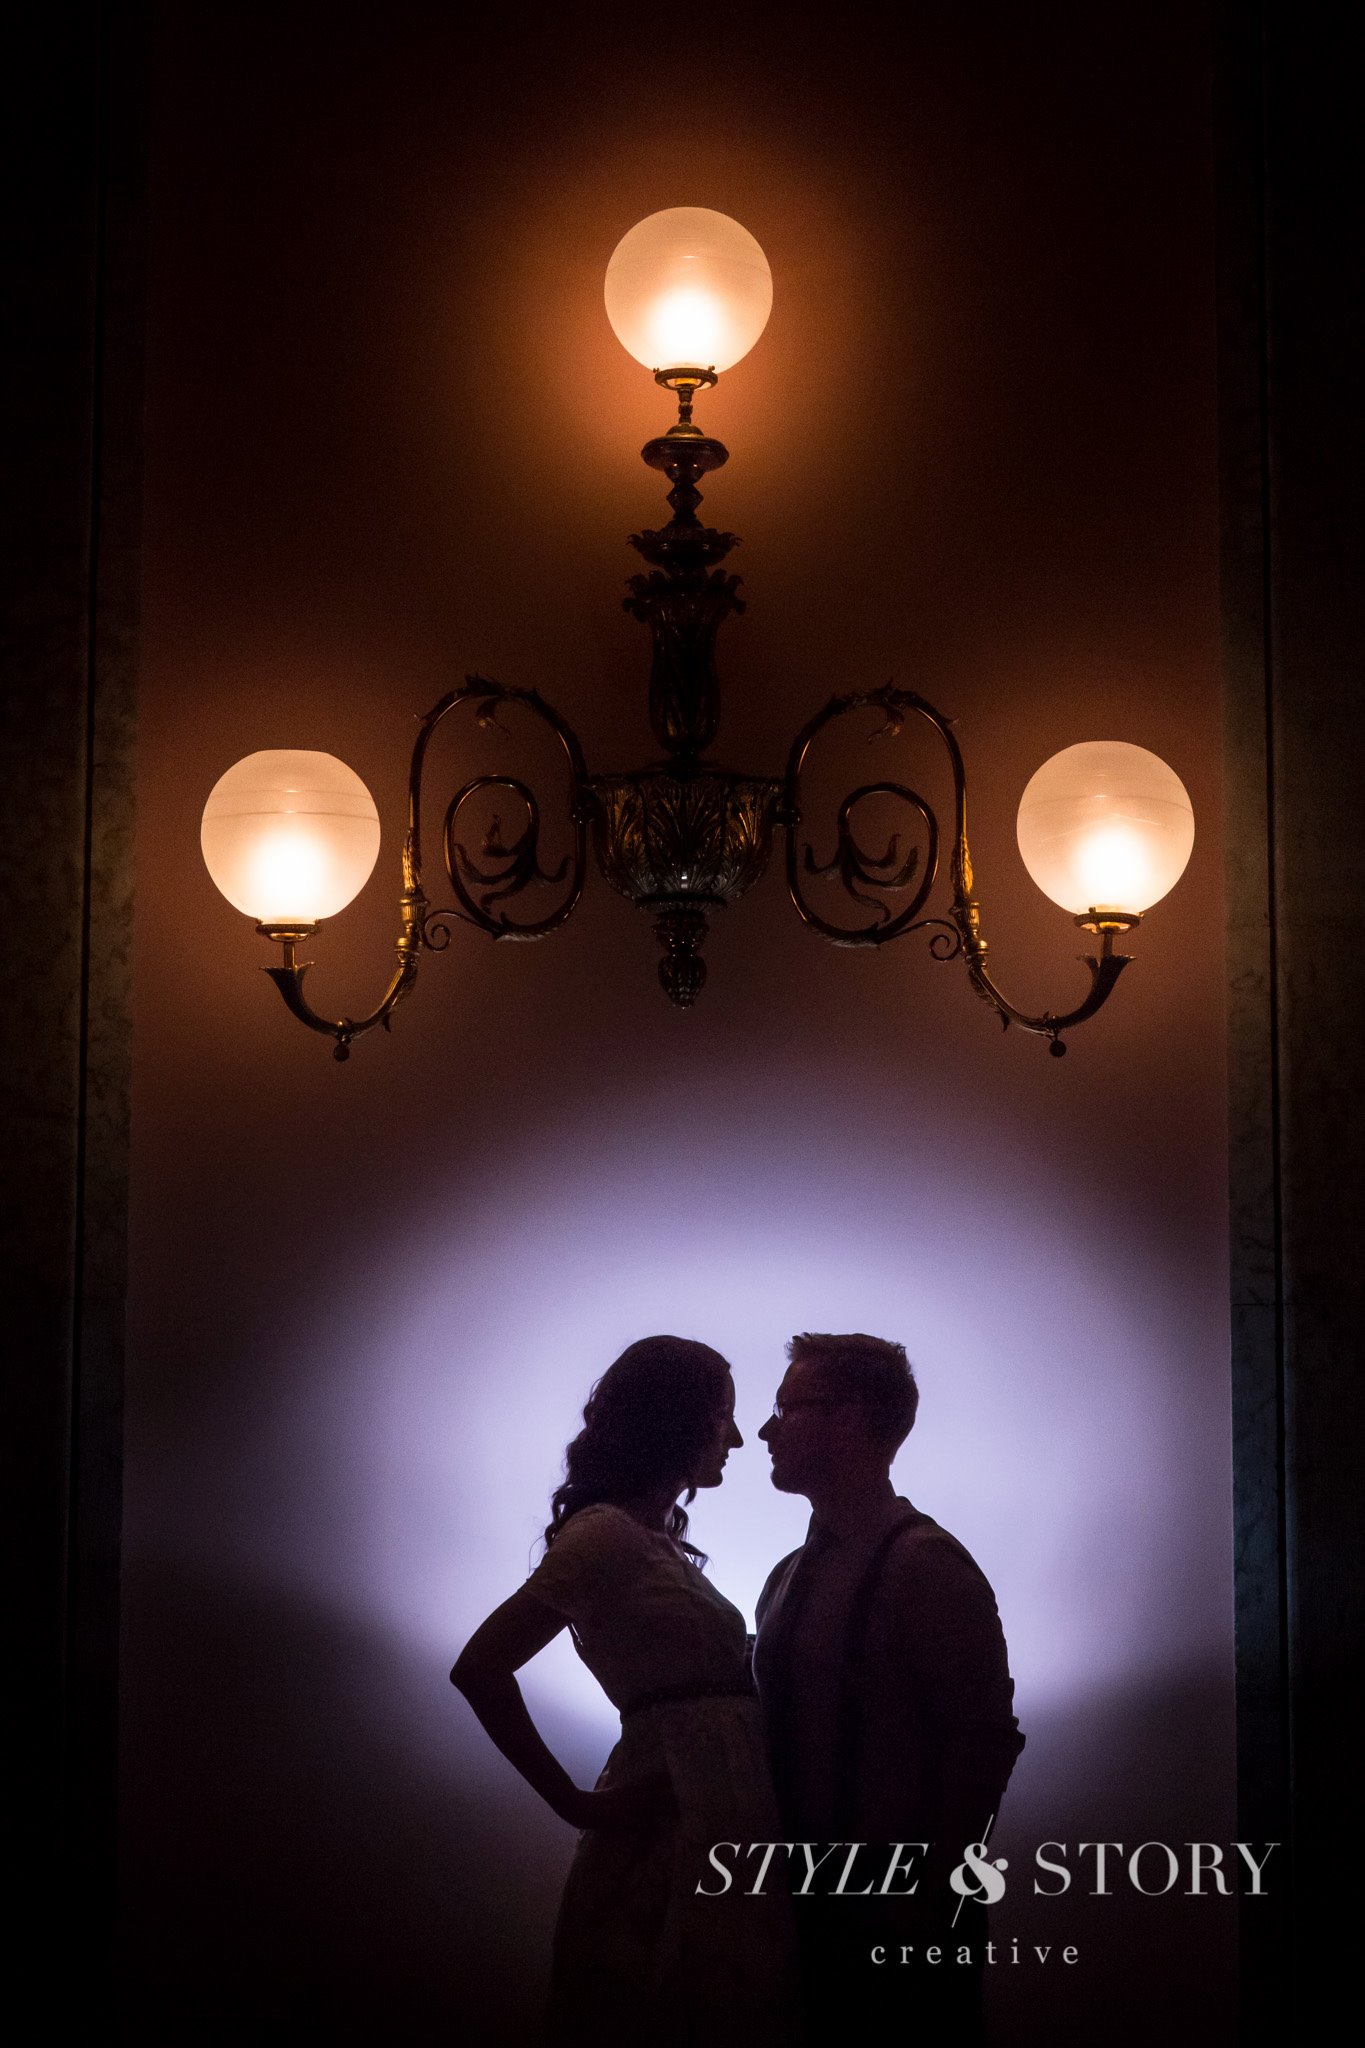
#5 Silhouette
One rad way of using a flash is to manipulate your lighting to create a silhouette. It’s the same concept as backlight but instead of pointing the light at the couple; point the light at the surface behind them. It is super important that the couple is posed correctly while creating this type of image. Posing someone the wrong way can make the couple look larger than they are, or just turn into one big blob.
General Rules:
• The closer your light is to the wall, the smaller of light circle you will create
• When creating silhouettes, be aware of posing the couple correctly. You want separation between the couple so that they don’t turn into a single blob.
• Lifting the chin up and extend the neck creates more of a defined posture.
• Girls should arch the smalls of their backs. And create gaps in between arms and legs.
• Guy should be turned ¾ turned toward you and looking over shoulder to make them appear bigger.
• When facing couples toward one another, never have their noses touch.
Camera Settings:
• Sigma 35mm
• Shutter Speed: 1/200
• f/ 5.6
• Iso: 100
Wrapping up:
Canon 600s are a super important piece of gear to us! They are versatile, lightweight, and powerful. Throughout a wedding day, we are constantly using these flashes to create incredible imagery, especially when photographing receptions.
This is one piece of equipment that is a must have for any wedding photographer.


+ show Comments
- Hide Comments
add a comment